Showing posts with label DIY. Show all posts

Monday, January 3, 2022

DIY Kitchen Reno, Part 2

 We completed step three of our kitchen reno! I know it's Monday, but here's a Friday Five of step three.

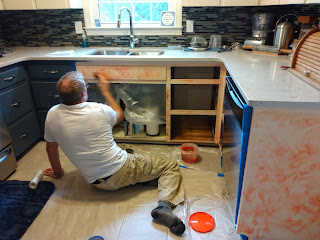
Calvin stripping with Citristrip.
1. Use a stripper. (Not that kind.) We chose a low-voc paint stripper because the odor of chemically suspicious oranges is much better than the kill-you-in-your-sleep fumes of acetone, methanol, and toluene.


Painting with a dark-ish primer.


 2. Have your husband do all the hard work—scraping and stripping off decades of paint and then sanding. When that’s done, you can paint at a restful, cathartic pace. Or, you can listen to “Girls Just Wanna to Have Fun” and try to finish the work before Christmas. (I finished in time.)


3. Shelves! When you buy an old home, you discover people didn’t have pantries. They had a broom closet, which we turned into a pantry. But my spice collection took up more than two shelves of broom-closet-cum-pantry. So, Calvin put up shelves. (Brackets from Amazon, wood and stain from Home Depot.) I told him, “Two shelves should be more than enough.” I didn’t realize I have 70 different spices, including sumac, nigella seed, and multiple varieties of za’atar. (Some folks collect tchotchkes, I collect spices.) Sadly, not all my spices fit on the shelves…


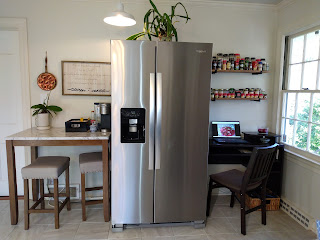
4. New refrigerator! This was not our plan. Especially not when appliance prices are obscene. But when the old refrigerator compressor dies… I love the new fridge. Its more compact size means I can put a desk next to the window—it’s good to have writing nooks and laptop space.

5. Finally, don’t forget to take dance breaks—even if you know your ruptured discs, inflamed nerves, and fusions will slap you later because, like I said earlier, girls just wanna have fun. (Clearly, I’ve listened to too much Pandora 80s radio.)

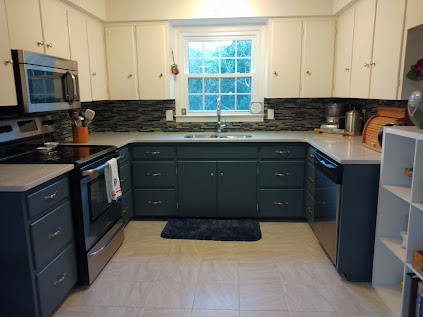
 Now that the kitchen reno is half-finished, we’re taking a break till spring. Then, we’ll paint the upper cabinets light gray and the walls white. And I hope to talk Calvin into a new light fixture instead of the 80s ceiling fan, which is coated with grime that even bleach won’t budge.

 The lower cabinets are painted with Behr paint, satin finish, in "Calligraphy."


Friday, November 5, 2021

Friday Five, DIY Tiling


My husband Calvin and I are redoing our kitchen. We have brand new quartz counters—so much better than the old Formica. And we have a new sink and faucet—which has a sprayer!! (The old kitchen to the left looks remarkably good in the photo. But it wasn't--the counter was coming apart, etc.)

When the old counters were removed, they left big gouges in the wall. So, we needed a new backsplash and decided to tile it ourselves.

 Here are five things I learned:

 1. Know your strengths and weakness. Let the artist (not me) pick the tile. He will absolutely know if it matches the counters. It will save time. And worry—or, at least it should…

Me: Are you sure it’s going to look good?

Artist husband: Yes.

Me tiling.
Me: Are you really, really sure it’s going to look good?

Him: Yes.

Me: Are you—

Him:  I’m really, really sure.

Me: (I’ll worry quietly now.)

 2. When you put adhesive on the wall, more is not more. It just means more clean-up. Lots more clean-up.

 3. Any DIY home project requires music. The best kind is 80s pop/rock. Nothing is better in the midst of a DIY than a dance break. Especially when “Sweet Dreams,” “Heartbreaker,” or “Girls Just Wanna Have Fun” starts playing on Pandora. (I'm definitely not posting a photo of this. :)

Wet saw.
 4. A wet saw. If you’re using a glass/stone mosaic tile, you have to have a wet saw. And if you have a friend who you can borrow one from…woot! Although don’t forget to put towels on the floor (as your friend suggested, but you forgot) because the saw spits water and ground tile, and you end up with a nasty puddle of gray gritty gunk all over the floor.

 5. Junky clothes. It’s so, so worth it to take the time to put on work clothes. Otherwise, halfway through the project you to say to the artist, “Uh, please tell me you aren’t wearing your good jeans…” Silence ensues. Thankfully, I’ve got a big box of Oxi-clean.

Next, step: Grouting.

Here's a close-up of the tiles, sink, and counter. (BTW, the garbage disposal has a magnetic collar to prevent silverware from getting chewed up. How cool is that?!)


Thursday, November 19, 2015

Veggies, DIY Doors, and Sunsets.

I'm almost halfway through the read-aloud edit of my latest novel. My goal is to have it finished and sent to beta readers before my daughter's surgery. (If you remember last May, my son had cardiothoracic reconstruction. My daughter also needs the procedure. Only hers will be a more invasive reconstruction. I know, it's hard to imagine anything more invasive.)

Besides editing, I've been doing some other things. Do you remember my Postage Stamp Garden? Well, it's mid-November and I'm still harvesting! (Though not in the quantities I was earlier in the season.) Here's some fruits of garden.

Bell peppers, jalapenos, ghost peppers, basil, and burgundy cherry tomatoes. Yum!
And since I'm never without a DIY project. Here are some photos.


I was going to paint the door on the left. But during some preliminary sanding, the paint began coming off in hunks and I had to start scraping. FYI to the previous owners of the house, you can't throw some latex paint on a solid mahogany door and think everything's going to be okay, i.e., latex on top of of oil isn't going to work. Ever.

In any case, on the right is the finished door to my office. And yes, you do see double-shelved stacks of books. (But no judging.)


And coolest thing of all, my dad found a strange, huge cocoon on a river birch tree in his yard. After a Facebook plea, we discovered that it's the cocoon for a Polyphemus moth, which has a six inch wing span. So we're going to put it in an empty aquarium and we can't wait to see it break free.


One last picture to share. Sunday evening on the way to church, we came over the ridge and were treated to this amazing sunset. And, of course, all I had was my cellphone and the photo quality doesn't do the sunset justice. (Sorry the photo is blurry. Traffic was whizzing past.)


Wednesday, October 7, 2015

DIY Cloche Hat

If you’ve been reading my blog for a while, you may remember that I was diagnosed with a rare auto-immune disease (alopecia areata) over a year ago. As far as auto immunes go, the one I have isn't a bad one. My immune system attacks my hair follicles and my hair falls out. It’s not bad for body hair, but not so nice when it’s hair on your head, eyelashes, etc.

Almost two years ago, I began treatment, which ended up being a series of 40 to 50 shots in my scalp every six weeks. Not fun. (And, eventually, insurance decided they didn’t want to cover the shots.)

But the shots weren't very effective, so my doctor switched me to an oral medication and topical steroids. The combination seemed to work. (Either that or I went into remission.) Now, neither is the case. I’m losing a lot of hair again. Maybe it will come back. Maybe I'll lose more.

Since I believe in preparing for the worst, my husband suggested I sew a hat. He even offered to go with me to the store, so I could buy fabric. (FYI, Calvin feels that the fabric store is a circle of the Inferno that Dante forgot to include. So when he offered to go with me…love endures all things.)

Here is the result of the purchases. 

The pattern for this cloche hat (Rosabelle), courtesy of sewmamasew is by Wendy Talene of Elsewhen Millinery. I decided to sew a hat rather than buy one because 1. It’s cheaper. 2. I have a rather large head—and if a hat doesn’t fit right, I get migraines.


After completing the hat, I would highly recommend this pattern. The instructions were very clear (unusual in patterns and highly unusual in patterns outside of traditional pattern makers). Also, the fit was perfect because the pattern includes very specific directions on how to choose/cut a size.

(One small caveat, I didn’t realize that pieces B1 and B2 were supposed to be taped together before cutting. Thankfully, I had extra fabric.)

Also, the pattern gives very specific directions if you chose to sew a hat from difficult or non-traditional hat fabric—stretch materials, linen, etc. Perfect for those of us who like to sew outside-of-the-box.

One final note, this pattern comes with instructions on how to make the most beautiful roses to add to the hat. I’m in the process of doing that using dark red/black taffeta. (I’ll update when I’m finished.) But I made several hat bands (including this black velvet with embroidered rosette), so I can interchange them based on my mood, occasion, etc.

And, yes, I will be buying another pattern from Elsewhere Millinery. The Kimberly in crushed velvet is calling my name for the holidays. (Also, the pattern author does make custom hats, so if sewing isn’t your expertise, you can still wear a beautiful hat.)

Elsewhere Millinery patterns gets a five star review from me!

Wednesday, September 23, 2015

Velvet Purse for a Writing Break

The last two weeks, I've been taking a break from my newest novel. (Though not from writing as I had a writing deadline approaching and needed to get my work to the editor.) I finished the first major edit of the novel and wanted to recharge before Edit, Part 2.

So I'm doing some needlework and sewing. I posted photos of a hand towel I embroidered last week. And I finished sewing a purse.


I used this pattern several years ago to make my son Matthew a set of black faux snakeskin gauntlets. And at the time I was intrigued by the "man bag" in the lower left corner. I thought it might make a lovely purse.

Recently as I was sorting through my bins of remnant fabric, I came across some chocolate-colored velvet and remembered the pattern. Of course, as I read through the pattern, I didn't like some of the construction--I didn't want to have to untie and tie a bow every time I opened my purse and I didn't want to have a belt strap on the top of the purse. So I re-engineered the pattern.

The finished project is below. I ended up using elastic cording as a drawstring closure, threading it through tiny buttonholes.  I added a tassel because the weight of the tassel keeps the flap of the purse closed. Also, the rounded trim was not cut on the bias. I cut it with the grain to give more shape to the flap without having to use stiff interfacing, which would make the seams bulky.

Now I'm waiting for the weather to change so I can start using the purse--velvet doesn't make sense in 80 degree weather.

Wednesday, February 11, 2015

DIY Bathroom Redo

If you've followed my blog for a while, you know I like to do DIY home repairs, mostly because I can't afford to hire a pro. And I like the challenge--we have a house built around 1920, so it makes things...complicated.

This DIY is a water closet. Yep, originally this bathroom was a closet. At some point, the owners turned the closet into a WC. And it hadn't been updated since. Sadly, I don't have photos of what we started with because this DIY started off piecemeal. For example, the faucet stopped working. I thought, "Simple, I know how to put in a new faucet." Except the sink was very, very old (and also very pink) and the openings in the sink didn't match modern faucets. So we replaced the pink sink with a white sink. Then, the toilet guts stopped working. And, of course, new toilet guts don't fit old toilets. So the hot pink toilet with the oh-so-attractive white toilet seat was replaced with a white toilet.

Then, the lighting died. We actually lived with a bathroom with no lights and no window for quite some time. Actually, it wasn't until my daughter moved out and I inherited her room as an office that I realized how useless it was. But I didn't want to pay an electrician. Electrical work is bit scary to me, so I didn't want to DIY it. I asked my son who's a college junior studying electrical engineering (he's getting good grades, I think that's important when you're putting your house and life on the line) to put in new lights. Queue first photo.

Why yes, that brown crumbly stuff is
"cellulose" insulation, i.e., shredded paper.
 Now I know what you're thinking, there's big hole in the wall! Yep, the original lights were wired into the medicine cabinet. EE son was appalled--do you know what kind of fire hazard that is? Son removed wiring from the medicine cabinet and commented, "Wow, I've never seen wires like these." He commenced Googling the very strange wires and told me to add a day to the completion of the lighting project.

Me in my painting gear.

Once the lights were installed and the mirror re-installed (this happened while I was shopping because EE son didn't want to teach me how to do wiring--I'm still sad about this. In any case, my youngest son helped EE son and, according to youngest son, when EE son turned the power back on he told youngest son, "Yell, if a fire starts." Apparently, it was supposed to be a joke. Youngest son (and mother who was shopping) were not amused.

Then came time to paint. The walls went from odd pink-white, perhaps the result of faded paint to bamboo green. I painted the walls. I painted the trim and the door white. It looked gorgeous. I even shined up all the brass door hardware. Check out photo. Left side, ugly hardware. Right side polished brass.

Everything was perfect. I bought a cute throw rug. I found some white towels that would accent the bathroom. I sewed an eyelet sink skirt. I even found a cotton-scented white candle in the back of a cupboard. I celebrated.

No longer are there any metal pipes. Everything is
modern PVC.
I celebrated too soon. An hour later, a drain pipe started leaking. And not just any drain pipe. It was the wall drainage pipe. So I removed all the pipes. I bought replacement parts. It seemed to work.  I did the happy dance. After all, I'd fixed hundred year old plumbing with a minimum of stress and inconvenience. I was a fool. Of course, the pipe leaked again. I fixed it again. It leaked again. I finally figured out the problem. One hundred years ago, they didn't mill pipes with the same precision that they do now. My pipe was about 1/64 of an inch off in interior width. So it looked good, but it would never be watertight with modern plumbing. I enlisted the help of my dad, a retired airline pilot/engineer/DIY extraordinaire. He made suggestions and bought parts. I installed the pieces. Fail. I tried other pieces. Fail. Finally, my dad found a rubber O ring. I put the pipes together using the O ring. No leaks...for 48 hours. Then, it leaked, a lot. I was ready to pitch a hissy fit. I got a flashlight, put on high-powered reading glasses, and discovered that O ring was so stiff, it twisted the nut off.  So I asked my husband, who is the strongest person I've ever met, to twist the nut back on. He did. It hasn't dared move since.

My bathroom is done! Here are photos.


Cool light installed by EE son.
Even the mirror looks normal now.

Sink skirt.
Scented candle and fluffy towels.
It all seems worth it now.


Monday, July 14, 2014

DIY Ugly Fence Fix


Each time we moved, we've bought a fixer-upper house. And most of the things we've had to fix ourselves. But sometimes, what I don't like isn't "broken," it's just ugly.

One thing I hate is that a lot of the fencing around the house is chain link. So no privacy and super, super ugly. At first I planted climbing roses. They were beautiful. A wall of roses. And then, they got rose rosette disease (also known as "witches broom"), which is untreatable and kills the plants.

So once again I had an ugly fence. And because of the residual effects of the disease, I couldn't plant more roses. But I needed something that formed a wall. Something beautiful that would turn a minus into a plus.

And then it hit me. Grapes. But we'd tried grapes before in a different area of the yard. It was a disaster.So I researched grape growing on Google. And bought plants at WalMart (I amended the soil--which is clay and pebbles with top soil and composted steer manure, i.e., cheap fertilizer). And my husband built a double cordon system. It sounds fancy, but it's basically eight feet posts buried about 16 inches into the ground with two levels of heavy gauge wire strung between them.

Last year, we followed simple double cordon guidelines and cut off extraneous vines as the plants grew. This summer, we had grapes. It was a lovely surprise because we weren't supposed to get grapes until next year.

To the right are Concord grapes, which we've already eaten. Small (probably because they weren't supposed to bear this year) but delicious.


To the left are red flames grapes. I can't wait for them to ripen.


And there's nothing more wonderful than seeing a wall of grapes. So bless that ugly chain link fence, without it the grapes wouldn't have the free air circulation and heavy sunlight that they love.


BTW, If you read last week's post about the 52 year old towels, one Facebook commenter mentioned that she has towels bought in 1945 that are in great shape. Wow, that's 69 years!

Monday, July 7, 2014

DIY Front Door Repair

My latest summer DIY project was our front door. (Originally, I wanted it to be our kitchen floor, but there may be asbestos issues, i.e., $$$ and we're still paying for the new porch.)

Instead, the front door started falling apart, and it became our fix-it-quick-before-it's-ruined project. Our front door is as old as our house. Almost 100 or 80 years depending on who you believe--the records aren't accurate. And the panels of the door had begun separating. Getting a new door wasn't really much of an option since it would mean serious money because our door is not standard.

So my husband Cal and I enlisted my dad's help. And these. Cinching straps and really long screws--6 inches long. They used the cinching straps and brute strength to pull the door together. Then they drilled an opening for the screws (not the full 6 inches, of course) and countersunk it. Afterwards, they put in the screws to secure it. (Thanks, Dad!)


After the door was secure, we used fiberglass filler to patch cracks in the door. Cal sanded the fiberglass. That takes more muscle than I've got, and he can do it before I can find and plug in the sander.

Here's the door primed.


(Sorry, no photo of the door in its original state. I always forget to take "before" photos. Just imagine a door warped and separated and you'll get the idea.)

We filled the screw holes with dowels and then covered those with more fiberglass patch. Here's what the side of the door looked like before sanding, priming and painting.

Pink stuff is the fiberglass patch.
Then, I painted. Here's the finished product, which went from medium gray to red.


Now, back to editing. 

Monday, March 24, 2014

All You Need Is A Can Of Spray Paint

First of all, I want to say thank you to everyone who picked up a free copy of Screwing Up Babylon. The giveaway blew my socks off. I nearly tripled my expectations. Thanks! Also note, I've now got a Mail Chimp sign up, so if you want to know when Screwing Up Alexandria is available or when I'm having another giveaway, sign up.

As you may know when I'm burned out on writing, I garden. (I also clean house, but that's not nearly as fun.) Saturday I did some "new porch gardening."

Before the new porch, we had some really ugly flowerpots (dead pink colored) that I filled with flowers during the summer. But I couldn't bear the thought of putting the flowerpots back on the porch. I thought about throwing the old ones out and buying new ones, but pots are expensive. So I bought a can of spray paint.

Here is the before. (Okay, not exactly before. It's in process. But you can see they were a dead pink color.)


Here is the after. (WalMart had geraniums on sale cheap. And I read how to over-winter geraniums by making them go dormant, so these hopefully should be the last geraniums I'll ever buy. Squee!)


The color of these photos isn't quite spot on, but you get the idea.
(Yeah, the porch still needs to be painted.)


So much better than dead pink!

Wednesday, January 16, 2013

Raindrops Keep Falling on the Computer


On Sunday, a huge band of storms moved into the area where we live. By Monday morning, a huge puddle had formed in our library (sounds fancy, but it’s just an oddly shaped room where we have a lot of bookcases). The puddle engulfed a computer.

Thankfully, the computer didn’t short-circuit (and none of the books were ruined—they were on the other side of the room). So we moved the furniture. We mopped floors and wiped walls and ceilings. Of course, the storm kept storming. We put basins, bowls, and towels everywhere.

Cal bought tar and went on the roof. Our roof was entirely replaced five years ago, but the warranty has expired. Of course. In order to give you a visual picture I have to describe Cal. He was wearing jeans with cut-off sweat pants over top to stay warm and a sweatshirt. But it was raining heavily, but he didn’t want to get his raincoat wet. So we got a contractor’s plastic bag and cut out head and arm holes. Then he put on a wide brimmed hat—I wish I’d taken a picture.

So he slapped tar all over the roof seams where one part of the roof attaches to the house. It’s a “vintage” home, code word for very old, so the roof does all kinds of weird things. After an hour, he came down. It seemed to help. Sort of.

On Tuesday, the leaking got worse. Cal bought more roof repair stuff—being that we own a “vintage” home, he’s on a first name basis with the Ace Hardware people. So he went and slopped more tar and plastic mesh on the roof seams. Halfway through, he came into the house. The bad thing was that Cal was wearing black shoes and didn’t realize that he had tar on his shoes until he’d tromped all over the house. It was especially evident on the winter white carpeting (so not my choice of colors). He called me. I took one look at the floor and said, “Oh, ‘cow poop.’” Okay, “cow poop” isn’t the word I used.

In case you don’t know, the only thing that gets lumps of footprinted tar off of carpet is turpentine.

It all seemed worth it when the leaks stopped. In spite of heavy rain, the roof stopped leaking for four hours. Then, the leaks started again. And not even lighter. Just as heavy as before, if not heavier.

So it’s time to call a roof repair company. And I’ll begin to ponder my new project—patching the walls and and ceiling, and then painting. Sigh.


Wednesday, August 8, 2012

DIY Kitchen, part 3

On Monday, Cal and I painted the walls. Yesterday while Cal ran errands (including getting Jacob his driver's license, credit card, checking account, and registering to vote), I painted trim. Yeah, I know, we really know how to "vacation." Here's the result.


I took these photos with a flash, so the color looks a shade lighter--but during the afternoon, the light is so intense, the paint does look royal blue. In the morning and evening, the color looks navy blue. I love the fact that the character of the room changes based on the time of day and lighting.
 Thus far in our kitchen update.

1. Replace windows (they leaked).

2. Refinish cabinets.

3. Paint walls and trim.

Next up, tile behind the stove for a backsplash. Our plan is to use one real Delft tile and surround it with smaller white tiles.

I'm also going to repaint my office the same colors after the sequel to Screwing Up Time is published.


Friday, July 27, 2012

DIY White Washed Cabinets

I've gotten several emails asking how our DIY kitchen refinishing project is going. The cabinets are done!! I was beginning to think I would die of stripping fume inhalation and we'd never finish. Or I'd  be permanently pocked by chemical burns, but the burns have all healed. So here are the cabinets.

This is what they looked like before. Fifties blonde with peeling shellac. Pieces of wood missing. Really ugly. So bad we wondered if they were salvageable. But we decided to give it a shot.


 Here we are in the middle of the process. I'm stripping the inside of the cupboards, and my husband Calvin is stripping the drawers. The house is seventy years old, and I had to rip out six different types of adhesive shelf paper--one from every decade.


Finished product. (Yes, the light coming in the windows actually looks that way. It glows off the cabinets in a cool blue tone. In the late afternoon, the kitchen is bathed in a pink glow.) The garden window was our first foray into kitchen refurbishing. You couldn't even see through the window that was there before.


Another view. Notice the walls--yeah, they're in really bad shape too. I think I've talked Cal into painting them on his vacation. So, there will be another installment of photos from the DIY kitchen.


I don't know if you noticed the plant hanging over the window. It's a tropical pitcher plant, a carnivorous plant. The pitchers are full of watery goo that attracts and digests bugs. I take it outside every couple of days to it can capture dinner. (This plant was my anniversary present. Some women want jewels--I want weird plants. And my husband indulges me.)


Next summer, we hope to fix the floor. Under several layers of linoleum is the original wood floor made of a double layer of 1 x 6 planks! I can't wait to refinish it.